1、主机环境信息
[root@localhost ~]# cat /etc/centos-release #查看系统版本
CentOS Linux release 7.4.1708 (Core)
主机ip:10.10.110.1 主机名称:HMYX 系统版本:CentOS 7.4
[root@localhost ~]# hostname HMYX #临时修改主机名称(永久修改vi /etc/hostname)
2、安装 Apache PHP Mysql
[root@HMYX ~]#yum -y install httpd php php-bcmath php-cli php-common php-gd php-ldap php-mbstring php-mysqlnd php-pear php-pdo php-xml php-xmlrpc
[root@HMYX ~]#yum install mysql
3、服务配置
[root@HMYX ~]# vi /etc/httpd/conf/httpd.conf
修改下面这些属性
#修改允许.htaccess
AllowOverride All
# 修改页面支持属性
DirectoryIndex index.html index.htm Default.html Default.htm index.php
# 新增支持 . pl 脚本
AddHandler cgi-script .cgi .pl
systemctl restart httpd.service #重启apache
systemctl enable httpd.service #开机启动apache
打开浏览器访问http://10.10.110.1/ #看是否能看见“Testing 123..”
如果不可以请尝试下面1、2、操作方法 #如果可以请路过
1、关闭firewall:
systemctl stop firewalld.service #停止firewall
systemctl disable firewalld.service #禁止firewall开机启动
关闭selinux # reboot 重启
vi /etc/selinux/config #永久关闭
#SELINUX=enforcing 修改1
#SELINUXTYPE=targeted 修改2
setenforce 0 临时关闭
配置数据库
[root@HMYX ~]# systemctl start mariadb.service 启动 mariadb 服务。
[root@HMYX ~]# systemctl enable mariadb.service 开机启动 mariadb 服务。
执行完这个命令下面就可以直接使用 mysql 命令了,跟 mysql 操作完全一样,至于里面细节就不去管他了,也用不到。
[root@HMYX ~]# mysql
Welcome to the MariaDB monitor. Commands end with ; or \g.
Your MariaDB connection id is 3
Server version: 5.5.56-MariaDB MariaDB Server
Copyright (c) 2000, 2017, Oracle, MariaDB Corporation Ab and others.
Type 'help;' or '\h' for help. Type '\c' to clear the current input statement.
MariaDB [(none)]> show databases;
+--------------------+
| Database |
+--------------------+
| information_schema |
| mysql |
| performance_schema |
| test |
+--------------------+
4 rows in set (0.00 sec)
MariaDB [(none)]>
MYSQL 数据库设置密码
[root@HMYX ~]# mysql_secure_installation
NOTE: RUNNING ALL PARTS OF THIS SCRIPT IS RECOMMENDED FOR ALL MariaDB
SERVERS IN PRODUCTION USE! PLEASE READ EACH STEP CAREFULLY!
In order to log into MariaDB to secure it, we'll need the current
password for the root user. If you've just installed MariaDB, and
you haven't set the root password yet, the password will be blank,
so you should just press enter here.
Enter current password for root (enter for none):
OK, successfully used password, moving on...
Setting the root password ensures that nobody can log into the MariaDB
root user without the proper authorisation.
Set root password? [Y/n] y
New password:
Re-enter new password:
Password updated successfully!
Reloading privilege tables..
... Success!
By default, a MariaDB installation has an anonymous user, allowing anyone
to log into MariaDB without having to have a user account created for
them. This is intended only for testing, and to make the installation
go a bit smoother. You should remove them before moving into a
production environment.
Remove anonymous users? [Y/n] y
... Success!
Normally, root should only be allowed to connect from 'localhost'. This
ensures that someone cannot guess at the root password from the network.
Disallow root login remotely? [Y/n] n
... skipping.
By default, MariaDB comes with a database named 'test' that anyone can
access. This is also intended only for testing, and should be removed
before moving into a production environment.
Remove test database and access to it? [Y/n] y
- Dropping test database...
... Success!
- Removing privileges on test database...
... Success!
Reloading the privilege tables will ensure that all changes made so far
will take effect immediately.
Reload privilege tables now? [Y/n] y
... Success!
Cleaning up...
All done! If you've completed all of the above steps, your MariaDB
installation should now be secure.
Thanks for using MariaDB!
5、进行php页面测试
[root@HMYX ~]# cd /var/www/html
[root@HMYX html]# vi index.php
<?php
phpinfo();
?>
浏览器输入服务器IP地址可以看到PHP页面 就ok咯
6、安装 discuz
简体中文 GBK
[root@HMYXhtml]#wget http://download.comsenz.com/DiscuzX/3.4/Discuz_X3.4_SC_GBK.zip
[root@HMYX html]# unzip Discuz_X3.4_SC_GBK.zip 解压discuz
[root@HMYX html]# ll -l #查看解压出来内容
总用量 11004
-rw-r--r--. 1 root root 11256627 10月 9 14:44 Discuz_X3.4_SC_GBK.zip
-rw-r--r--. 1 root root 20 11月 28 15:25 index.php
drwxr-xr-x. 2 root root 102 10月 2 14:00 readme
drwxr-xr-x. 13 root root 4096 10月 2 14:01 upload
drwxr-xr-x. 4 root root 94 10月 2 14:00 utility
[root@HMYX html]# cp -R ./upload /var/www/bbs
[root@HMYX html]#chown apache:apache -R /var/www/bbs
[root@HMYX html]#cd /var/www/bbs #进去BBS给予几个目录权限访问
[root@HMYX bbsl]# chmod -R 777 config
[root@HMYX bbsl]# chmod -R 777 data
[root@HMYX bbsl# chmod -R 777 uc_client
[root@HMYX bbsl]# chmod -R 777 uc_server
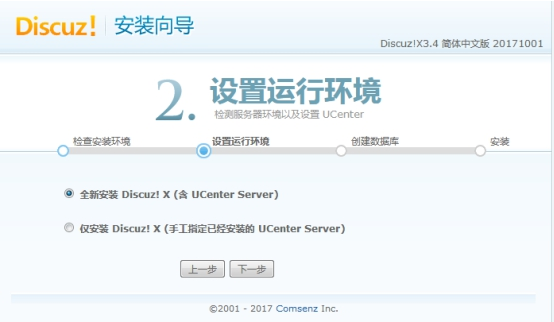
打开浏览器访问http://10.10.110.1/install/
7、安装论坛

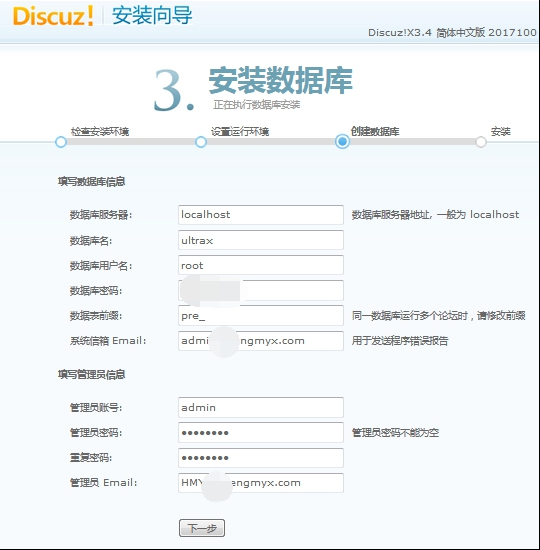

安装完成!!!!!
微信扫描下方的二维码阅读本文